
#接入现有应用
目前,Lynx 并不适合从零开始构建一个新的应用,你需要将 Lynx(引擎)集成自原生移动应用或 Web 应用中,通过 Lynx 视图加载 Lynx 应用。通过几个步骤,你就可以在你的应用中进行 Lynx 开发了。
选择你的目标平台查看具体的集成步骤:
#将 Lynx 集成到 iOS 平台
- 本文假设你已熟悉原生 iOS 应用开发的基本概念。
- 下文中的所有代码,你都可以参考项目: integrating-lynx-demo-projects
#1. 依赖配置
使用 Cocoapods 可以方便的将 Lynx 集成到你的应用中
- Cocoapods: >= 1.11.3
- Ruby: >= 2.6.10
#配置依赖
- Lynx
Lynx Engine 核心能力,包含了解析 Bundle、样式解析、排版以及渲染视图等基础能力。
从 Cocoapods 中获取 Lynx 的最新版本。然后将 Lynx 添加到你的 Podfile 中:
source 'https://cdn.cocoapods.org/'

platform :ios, '10.0'

target 'YourTarget' do
  pod 'Lynx', '3.2.0', :subspecs => [
    'Framework',
  ]

  pod 'PrimJS', '2.12.0', :subspecs => ['quickjs', 'napi']
end- Lynx Service
Lynx Service 包括 LynxImageService、LynxLogService 等,旨在提供一些宿主应用特性强相关的能力,允许宿主应用在运行时注入自定义实现 Image Service 默认是使用 SDWebImage 图片库实现,在没有集成 SDWebImage 组件的宿主应用上则可以依赖其他图片库。
Lynx 提供了标准的原生 Image、Log、Http 服务的能力,接入方可以快速接入并使用;
从 Cocoapods 中获取 Lynx Service 的最新版本。然后将 Lynx Service 添加到你的 Podfile 中:
source 'https://cdn.cocoapods.org/'

platform :ios, '10.0'

target 'YourTarget' do
  pod 'Lynx', '3.2.0', :subspecs => [
    'Framework',
  ]

  pod 'PrimJS', '2.12.0', :subspecs => ['quickjs', 'napi']

  # integrate image-service, log-service, and http-service
  pod 'LynxService', '3.2.0', :subspecs => [
      'Image',
      'Log',
      'Http',
  ]

  # ImageService
  pod 'SDWebImage','5.15.5'
  pod 'SDWebImageWebPCoder', '0.11.0'
end#安装依赖
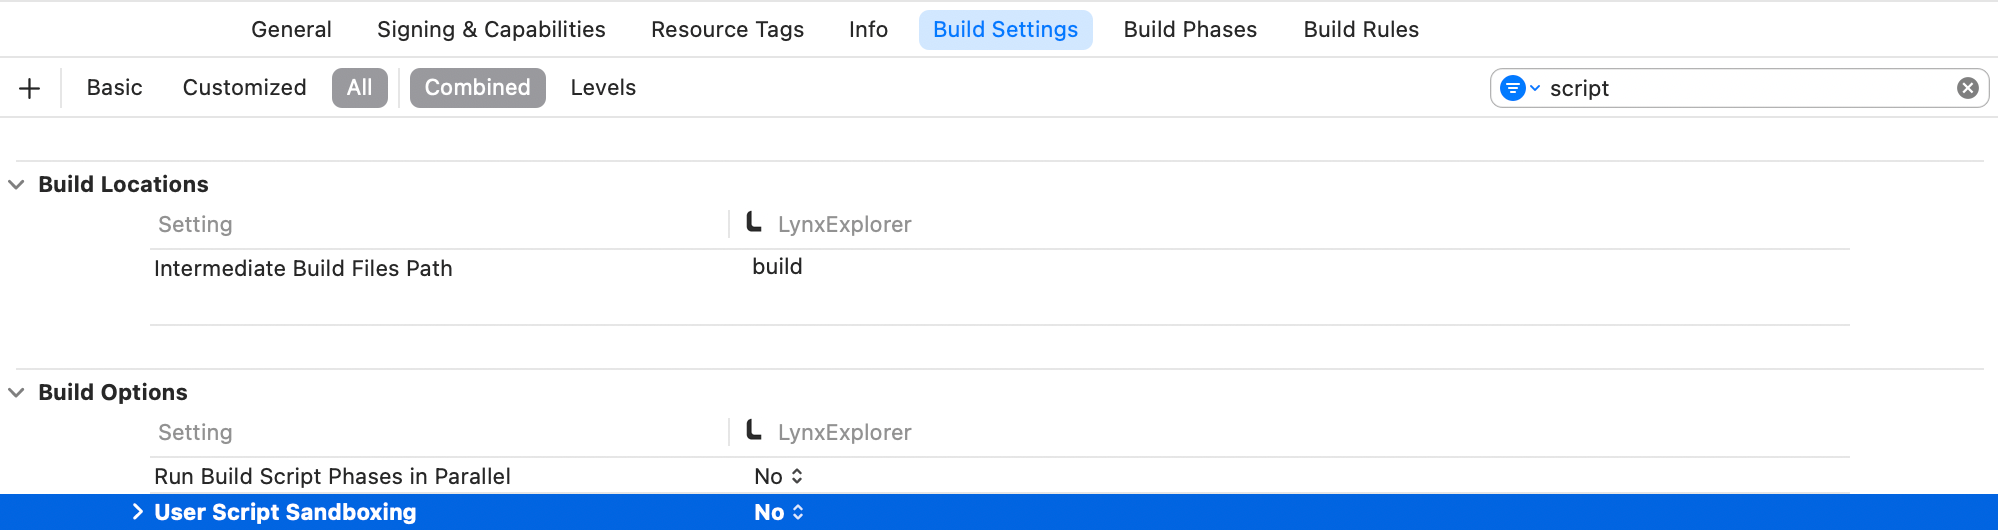
运行 pod install 安装依赖,然后打开你的 XCode 工程,同时需要确保关闭 Sandbox Scripting 能力。
为了关闭 Sandbox Scripting 能力,在 XCode 中点击应用,切换至 Build Settings。过�滤 script 关键字,并且将 User Script Sandboxing 置为 NO。
#2. Lynx 环境初始化
#LynxEnv 初始化
LynxEnv 提供了 Lynx Engine 的全局初始化接口。请保证 LynxEnv 的初始化发生在 Lynx Engine 的任何接口调用之前;例如可以在 AppDelegate 中完成初始化
#import <Lynx/LynxEnv.h>
#import <Lynx/LynxView.h>

@implementation AppDelegate
- (BOOL)application:(UIApplication *)application didFinishLaunchingWithOptions:(NSDictionary *)launchOptions {
  [LynxEnv sharedInstance];
  return YES;
}#3. 渲染 LynxView
LynxView 是 Lynx Engine 提供的渲染基本单元,LynxView 是一个继承自 iOS 原生 UIView 的实现,你可以快速的构造一个 LynxView,并将其添加到 ViewController 的视图上。
#创建 Bundle 加载器
Lynx Engine 自身并没有资源加载的能力,因此需要在初始化 LynxEnv,或者构造 LynxView 时传入 LynxTemplateProvider 协议的具体实现,Lynx 会采用注入的资源加载器来获取真实的 Bundle 内容
你可以使用多种方式获取 Bundle 的资源内容,在这里我们选择将 Bundle 的内容内置在应用中:
- 首先请将快速上手阶段生成的 Bundle 文件或者将下面的文件下载到本机上,然后按照如下步骤将文件内置:
内置文件步骤:
- 在项目的目标设置中,选择目标 Target;
- 选择 Build Phases 选项卡;
- 在 Copy Bundle Resources 部分,点击加号按钮(+)以添加文件;
- 实现 Bundle 加载器
#import <Foundation/Foundation.h>
#import <Lynx/LynxTemplateProvider.h>

NS_ASSUME_NONNULL_BEGIN

@interface DemoLynxProvider : NSObject <LynxTemplateProvider>

@end

NS_ASSUME_NONNULL_END#import <Foundation/Foundation.h>
#import "DemoLynxProvider.h"
@implementation DemoLynxProvider
- (void)loadTemplateWithUrl:(NSString*)url onComplete:(LynxTemplateLoadBlock)callback {
NSString *filePath = [[NSBundle mainBundle] pathForResource:url ofType:@"bundle"];
if (filePath) {
NSError *error;
NSData *data = [NSData dataWithContentsOfFile:filePath options:0 error:&error];
if (error) {
NSLog(@"Error reading file: %@", error.localizedDescription);
callback(nil, error);
} else {
callback(data, nil);
}
} else {
NSError *urlError = [NSError errorWithDomain:@"com.lynx"
code:400
userInfo:@{NSLocalizedDescriptionKey : @"Invalid URL."}];
callback(nil, urlError);
}
}
@end#构造基础 LynxView
按照如下的方式构造一个最基础的 LynxView 实例:
#import <Lynx/LynxView.h>
#import "ViewController.h"
#import "DemoLynxProvider.h"

@implementation ViewController

- (void)viewDidLoad {
    [super viewDidLoad];
    LynxView *lynxView = [[LynxView alloc] initWithBuilderBlock:^(LynxViewBuilder *builder) {
      builder.config = [[LynxConfig alloc] initWithProvider:[[DemoLynxProvider alloc] init]];
      builder.screenSize = self.view.frame.size;
      builder.fontScale = 1.0;
    }];
    lynxView.preferredLayoutWidth = self.view.frame.size.width;
    lynxView.preferredLayoutHeight = self.view.frame.size.height;
    lynxView.layoutWidthMode = LynxViewSizeModeExact;
    lynxView.layoutHeightMode = LynxViewSizeModeExact;
}
@end#将 LynxView 添加到视图
然后将 LynxView 添加到应用视图中:
#import <Lynx/LynxView.h>

#import "ViewController.h"
#import "DemoLynxProvider.h"

@implementation ViewController

- (void)viewDidLoad {
  [super viewDidLoad];

  // ...

  [self.view addSubview:lynxView];
}

@end#渲染视图
当你完成以上步骤之后,你就已经完成了 LynxView 初始化的全部工作,调用 lynxView.loadTemplateFromURL 方法,即可将对应的 Bundle 渲染到 LynxView 视图上,
#import <Lynx/LynxView.h>

#import "ViewController.h"
#import "DemoLynxProvider.h"

@implementation ViewController

- (void)viewDidLoad {
  [super viewDidLoad];

  // ...

  [lynxView loadTemplateFromURL:@"main.lynx" initData:nil];
}

@end
然后你将在屏幕上看到如下内容:
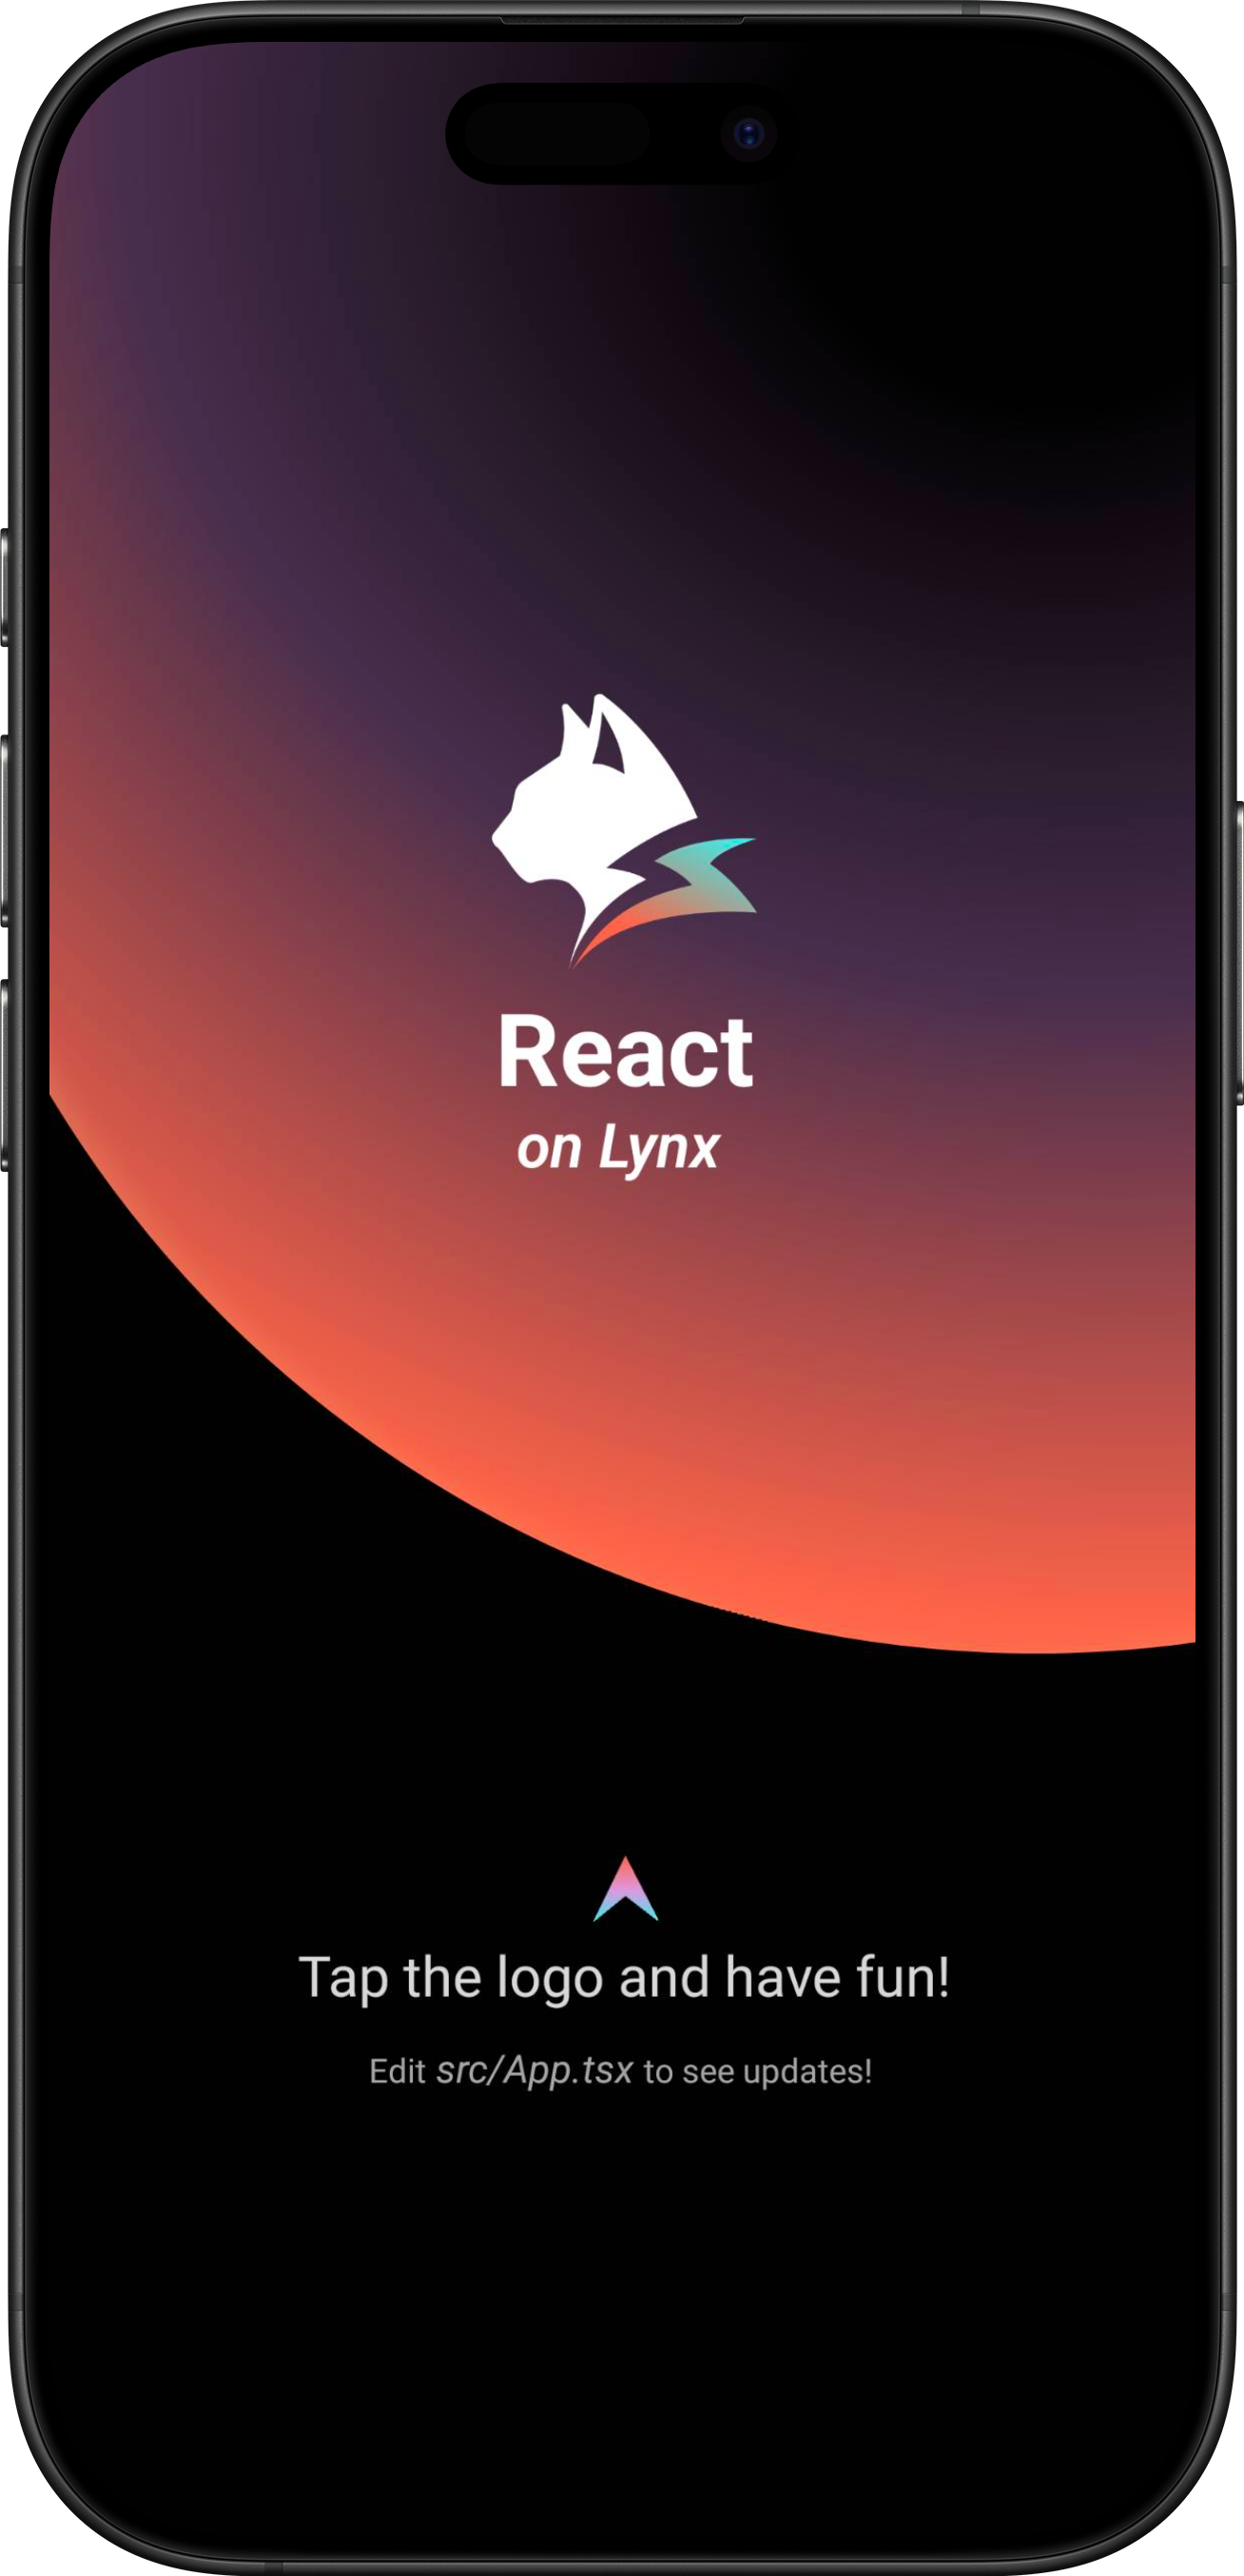
恭喜你,现在你现在已经完成了 Lynx Engine 集成的全部工作!
#4. 进入 Lynx 世界
#将 Lynx 集成到 Android 平台
- 本文假设你已熟悉原生 Android 应用开发的基本概念。
- 下文中的所有代码,你都可以参考项目: integrating-lynx-demo-projects
#1. 依赖配置
#包依赖
- Lynx
Lynx Engine 核心能力,包含了解析 Bundle、样式解析、排版以及渲染视图等基础能力,以及 Lynx 页面依赖的 JavaScript 运行时基础代码
dependencies {
    // lynx dependencies
    implementation "org.lynxsdk.lynx:lynx:3.2.0"
    implementation "org.lynxsdk.lynx:lynx-jssdk:3.2.0"
    implementation "org.lynxsdk.lynx:lynx-trace:3.2.0"
    implementation "org.lynxsdk.lynx:primjs:2.12.0"
}- Lynx Service
Lynx Service 包括 LynxImageService、LynxLogService 等,旨在提供一些宿主应用特性强相关的能力,允许宿主应用在运行时注入自定义实现,也可以使用 Lynx 提供的默认实现。
例如 LynxImageService 默认是使用 Fresco 图片库实现,在没有集成 Fresco 组件的应用上则可以依赖其他图片库,比如 Glide 来实现。Lynx 提供了标准的原生 Image、Log、Http 服务的能力,接入方可以快速接入并使用;
dependencies {
    // lynx dependencies
    implementation "org.lynxsdk.lynx:lynx:3.2.0"
    implementation "org.lynxsdk.lynx:lynx-jssdk:3.2.0"
    implementation "org.lynxsdk.lynx:lynx-trace:3.2.0"
    implementation "org.lynxsdk.lynx:primjs:2.12.0"

    // integrating image-service
    implementation "org.lynxsdk.lynx:lynx-service-image:3.2.0"

    // image-service dependencies, if not added, images cannot be loaded; if the host APP needs to use other image libraries, you can customize the image-service and remove this dependency
    implementation "com.facebook.fresco:fresco:2.3.0"
    implementation "com.facebook.fresco:animated-gif:2.3.0"
    implementation "com.facebook.fresco:animated-webp:2.3.0"
    implementation "com.facebook.fresco:webpsupport:2.3.0"
    implementation "com.facebook.fresco:animated-base:2.3.0"

    implementation "com.squareup.okhttp3:okhttp:4.9.0"

    // integrating log-service
    implementation "org.lynxsdk.lynx:lynx-service-log:3.2.0"

    // integrating http-service
    implementation "org.lynxsdk.lynx:lynx-service-http:3.2.0"
}#配置混淆规则 (Proguard)
Lynx Engine 混淆规则如下,建议参考最新的源码配置:
# LYNX START
# use @Keep to annotate retained classes.
-dontwarn android.support.annotation.Keep
-keep @android.support.annotation.Keep class **
-keep @android.support.annotation.Keep class ** {
    @android.support.annotation.Keep <fields>;
    @android.support.annotation.Keep <methods>;
}
-dontwarn androidx.annotation.Keep
-keep @androidx.annotation.Keep class **
-keep @androidx.annotation.Keep class ** {
    @androidx.annotation.Keep <fields>;
    @androidx.annotation.Keep <methods>;
}

# native method call
-keepclasseswithmembers,includedescriptorclasses class * {
    native <methods>;
}
-keepclasseswithmembers class * {
    @com.lynx.tasm.base.CalledByNative <methods>;
}

# to customize a module, you need to keep the class name and the method annotated as LynxMethod.
-keepclasseswithmembers class * {
    @com.lynx.jsbridge.LynxMethod <methods>;
}

-keepclassmembers class *  {
    @com.lynx.tasm.behavior.LynxProp <methods>;
    @com.lynx.tasm.behavior.LynxPropGroup <methods>;
    @com.lynx.tasm.behavior.LynxUIMethod <methods>;
}

-keepclassmembers class com.lynx.tasm.behavior.ui.UIGroup {
    public boolean needCustomLayout();
}

# in case R8 compiler may remove mLoader in bytecode.
# as mLoader is not used in java and passed as a WeakRef in JNI.
-keepclassmembers class com.lynx.tasm.LynxTemplateRender {
    private com.lynx.tasm.core.LynxResourceLoader mLoader;
}

# the automatically generated setter classes use the class names of LynxBaseUI and ShadowNode and their subclasses.
-keep class com.lynx.tasm.behavior.ui.LynxBaseUI
-keep class com.lynx.tasm.behavior.shadow.ShadowNode
-keep class com.lynx.jsbridge.LynxModule { *; }
-keep class * extends com.lynx.tasm.behavior.ui.LynxBaseUI
-keep class * extends com.lynx.tasm.behavior.shadow.ShadowNode
-keep class * extends com.lynx.jsbridge.LynxModule { *; }
-keep class * extends com.lynx.jsbridge.LynxContextModule
-keep class * implements com.lynx.tasm.behavior.utils.Settable
-keep class * implements com.lynx.tasm.behavior.utils.LynxUISetter
-keep class * implements com.lynx.tasm.behavior.utils.LynxUIMethodInvoker
-keep class com.lynx.tasm.rendernode.compat.**{
    *;
}
-keep class com.lynx.tasm.rendernode.compat.RenderNodeFactory{
    *;
}
# LYNX END#2. 环境初始化
#LynxService 初始化
- Lynx Service 提供了宿主特性相关能力,推荐在应用的
Application#onCreate生命周期中完成 Lynx Service 的初始化; - Lynx Service 需主动注入;
Lynx 需要在应用启动时进行一些全局的初始化操作,请在 AndroidManifest.xml 文件中指定你自定义的 Application 类。
<application
  android:name=".YourApplication">
</application>import android.app.Application;
import com.facebook.drawee.backends.pipeline.Fresco;
import com.facebook.imagepipeline.core.ImagePipelineConfig;
import com.facebook.imagepipeline.memory.PoolConfig;
import com.facebook.imagepipeline.memory.PoolFactory;
import com.lynx.service.http.LynxHttpService;
import com.lynx.service.image.LynxImageService;
import com.lynx.service.log.LynxLogService;
import com.lynx.tasm.service.LynxServiceCenter;
public class YourApplication extends Application {
@Override
public void onCreate() {
super.onCreate();
initLynxService();
}
private void initLynxService() {
// init Fresco which is needed by LynxImageService
final PoolFactory factory = new PoolFactory(PoolConfig.newBuilder().build());
ImagePipelineConfig.Builder builder =
ImagePipelineConfig.newBuilder(getApplicationContext()).setPoolFactory(factory);
Fresco.initialize(getApplicationContext(), builder.build());
LynxServiceCenter.inst().registerService(LynxImageService.getInstance());
LynxServiceCenter.inst().registerService(LynxLogService.INSTANCE);
LynxServiceCenter.inst().registerService(LynxHttpService.INSTANCE);
}
}#LynxEnv 初始化
LynxEnv 提供了 Lynx Engine 的全局初始化接口, 请保证 LynxEnv 的初始化发生在 Lynx Engine 的任何接口调用之前; 推荐在应用的 Application#onCreate 生命周期中完成 LynxEnv 的初始化;
import com.lynx.tasm.LynxEnv;

public class YourApplication extends Application {

    @Override
    public void onCreate() {
        super.onCreate();
        initLynxService();
        initLynxEnv();
    }

    private void initLynxEnv() {
        LynxEnv.inst().init(
            this,
            null,
            null,
            null
        );
    }
}LynxEnv 初始化方法参数说明如下:
- appContext: 应用生命周期上下文对象,即 ApplicationContext;
- libraryLoader: 本地 so 文件加载器,默认可传 null,即使用系统默认加载器;
- templateProvider: 全局的 AppBundle 加载器,默认可传 null;
- behaviorBundle: 自定义组件列表,默认可传 null,如有定制化需求可参考自定义组件;
#3. 渲染 LynxView
#创建 Bundle 加载器
Lynx Engine 自身并没有集成下载资源的能力,因此需要宿主应用来提供 AbsTemplateProvider 的具体实现,并在构造 LynxView 时注入,Lynx 会采用注入的资源加载器来获取真实的 Bundle 内容。
你可以使用多种方式获取 Bundle 的资源内容,在这里我们选择将 Bundle 的内容内置在应用中:
- 首先请将快速上手阶段生成的 Bundle 文件放置在 src/main/assets 目录下,或者你可以将下面的文件下载到本机上并放置在同样目录下:
app
└── src
    └── main
        ├── java
        ├── res
        └── assets
└── main.lynx.bundle- 实现 Bundle 加载器
import android.content.Context;
import com.lynx.tasm.provider.AbsTemplateProvider;
import java.io.ByteArrayOutputStream;
import java.io.IOException;
import java.io.InputStream;

public class DemoTemplateProvider extends AbsTemplateProvider {
    private Context mContext;

    DemoTemplateProvider(Context context) {
        this.mContext = context.getApplicationContext();
    }

    @Override
    public void loadTemplate(String uri, Callback callback) {
        new Thread(new Runnable() {
            @Override
            public void run() {
                try (InputStream inputStream = mContext.getAssets().open(uri);
                     ByteArrayOutputStream byteArrayOutputStream = new ByteArrayOutputStream()) {
                    byte[] buffer = new byte[1024];
                    int length;
                    while ((length = inputStream.read(buffer)) != -1) {
                        byteArrayOutputStream.write(buffer, 0, length);
                    }
                    callback.onSuccess(byteArrayOutputStream.toByteArray());
                } catch (IOException e) {
                    callback.onFailed(e.getMessage());
                }
            }
        }).start();
    }
}#构造 LynxView
LynxView 是 Lynx Engine 提供的渲染基本单元,LynxView 是继承自 Android 原生 View,你可以快速的构造一个 LynxView,并将其任意添加到原生 Android 视图树上。
import android.app.Activity;
import android.os.Bundle;

import com.lynx.tasm.LynxView;
import com.lynx.tasm.LynxViewBuilder;

public class MainActivity extends Activity {

    @Override
    protected void onCreate(Bundle savedInstanceState) {
        super.onCreate(savedInstanceState);
        LynxView lynxView = buildLynxView();
        setContentView(lynxView);
    }

    private LynxView buildLynxView() {
        LynxViewBuilder viewBuilder = new LynxViewBuilder();
        viewBuilder.setTemplateProvider(new DemoTemplateProvider(this));
        return viewBuilder.build(this);
    }
}#渲染视图
当你完成以上步骤之后,已经完成了 LynxView 创建与资源读取的全部工作,调用 lynxView.renderTemplateUrl 方法,即可将对应的 Bundle 内容渲染到 LynxView 视图上。
public class MainActivity extends Activity {

    @Override
    protected void onCreate(Bundle savedInstanceState) {
        super.onCreate(savedInstanceState);
        LynxView lynxView = buildLynxView();
        setContentView(lynxView);

        String url = "main.lynx.bundle";
        lynxView.renderTemplateUrl(url, "");
    }
}
然后你将在屏幕上看到如下内容:
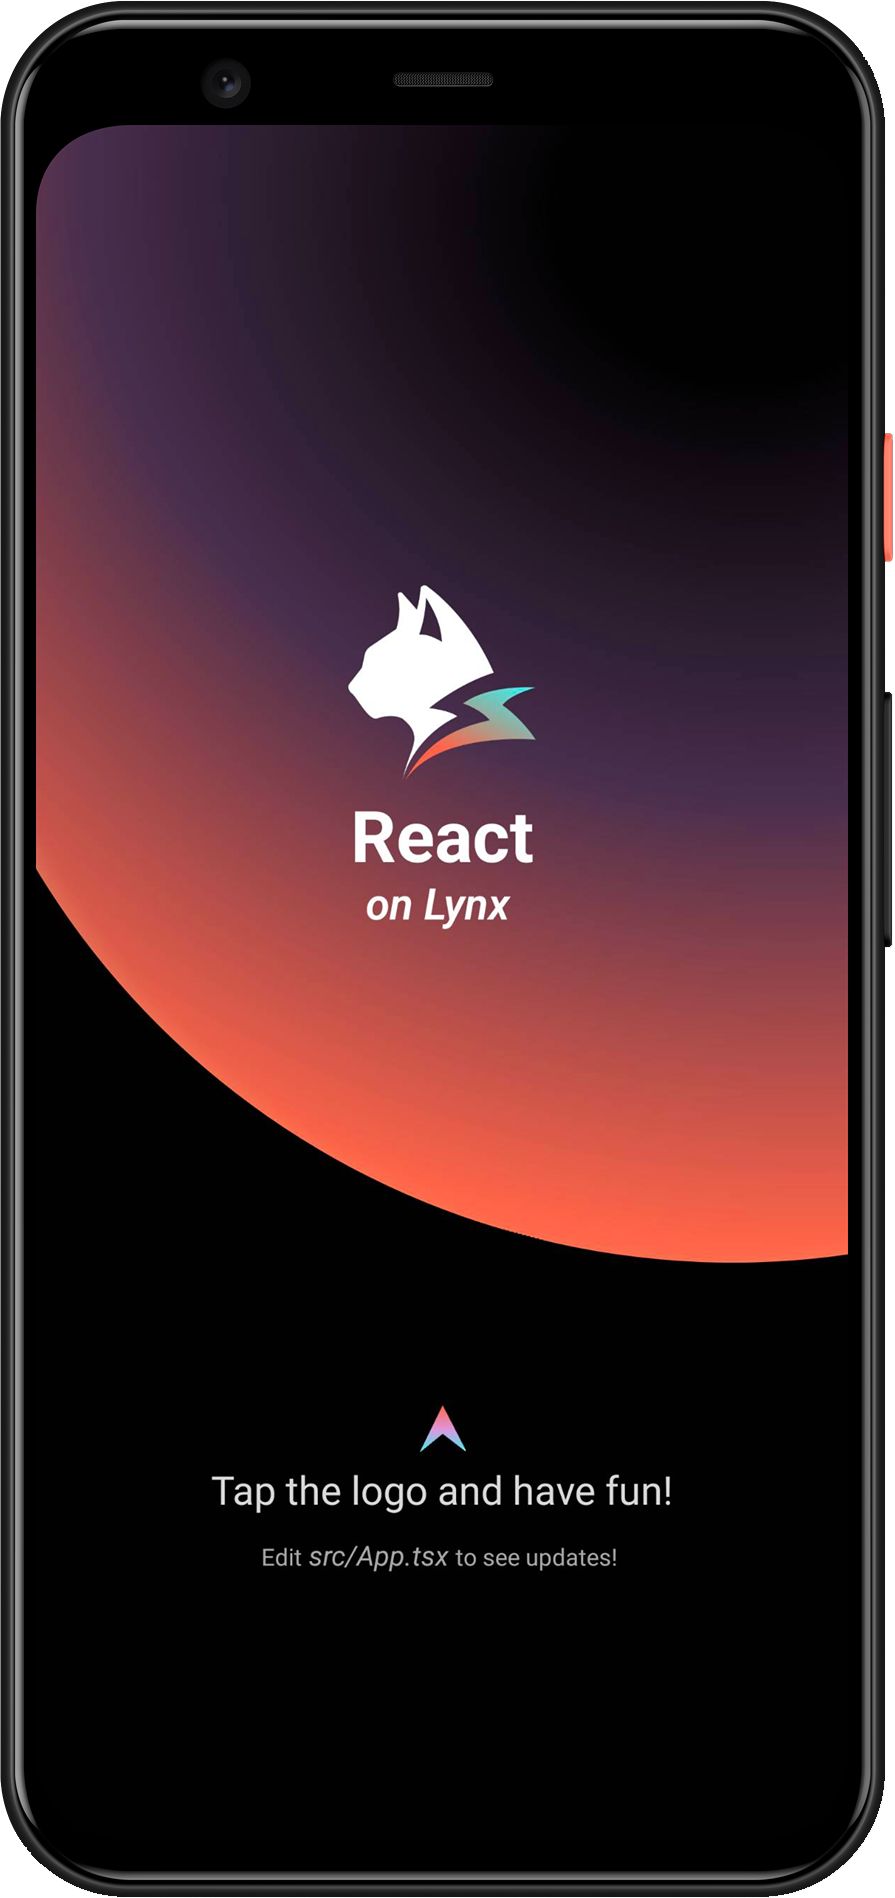
恭喜你,现在你现在已经完成了 Lynx Engine 集成的全部工作!
#4. 进入 Lynx 世界
#将 Lynx 集成到 Web 平台
Lynx for Web 在 Web 浏览器中实现了 Lynx 引擎。通过 Lynx for Web,你可以轻松地将 Lynx 应用集成到任何现有的 Web 项目中,无论该项目使用的是 React、Vue、Svelte 还是纯 HTML。
#1. 构建 web 产物
我们需要你已经阅读并��按照快速开始创建了一个 Lynx 项目。
#添加 web 配置
- 进入 Lynx 项目:
cd <lynx-project-name>lynx.config.ts增加 web 配置(environments.web):
import { defineConfig } from '@lynx-js/rspeedy';
import { pluginReactLynx } from '@lynx-js/react-rsbuild-plugin';

export default defineConfig({
  plugins: [pluginReactLynx()],
  environments: {
    web: {
      output: {
        assetPrefix: '/',
      },
    },
    lynx: {},
  },
});#构建
执行:
npm run build你将会看到项目中多出了 dist/main.lynx.bundle 文件,它就是最终的 web 构建产物。
#2. 接入 web 项目
目前你已经有了一份 Lynx for Web 构建产物,接下来我们需要创建一个 web 工程去使用它,这里使用 Rsbuild。
#创建一个 web 项目
在上述的 Lynx 项目同级,创建一个新的工程,执行:
npm create rsbuild@latest跟随提示来创建一个 React 项目。
#配置工程
- 进入 Web 项目:
cd <web-project-name>- 安装依赖:
npm install @lynx-js/web-core @lynx-js/web-elements- 在
src/app.tsx引入这些依赖:
import './App.css';
import '@lynx-js/web-core/index.css';
import '@lynx-js/web-elements/index.css';
import '@lynx-js/web-core';
import '@lynx-js/web-elements/all';

const App = () => {
  return (
    <lynx-view
      style={{ height: '100vh', width: '100vw' }}
      url="/main.web.bundle"
    ></lynx-view>
  );
};

export default App;- 更新
rsbuild.config.ts
server.publicDir 需要更换为你实际的 Lynx 项目路径。
import { defineConfig } from '@rsbuild/core';
import { pluginReact } from '@rsbuild/plugin-react';
import path from 'node:path';
import { fileURLToPath } from 'node:url';
const __filename = fileURLToPath(import.meta.url);
const __dirname = path.dirname(__filename);

export default defineConfig({
  plugins: [pluginReact()],
  server: {
    publicDir: [
      {
        name: path.join(
          __dirname,
          '../',
          // 这里请替换为你实际的 Lynx 项目名称
          'lynx-project',
          'dist',
        ),
      },
    ],
  },
});#启动工程
执行:
npm run dev访问 http://localhost:3000 即能看到你的 Lynx 应用。